Recent Posts

  • Windows activation inside Proxmox

    Now that you have a working Win11 ISO, you can take advantage of the SMBIOS hardware licensing feature that most manufacturers use. This means you don’t need to bother with typing in product keys all the time.

    All you need to do is extract some the required details from a machine that has hardware licensing stored in its firmware.

    It’s important that you are aware that to remain compliant with the OEM license, you are required to be running the VM on same machine you’ve extracted the firmware activation tables from.

    Run the following script to extract the relevant bits:

    mkdir -p /tmp/MSDM
    cd /tmp/MSDM
    for f in SLIC MSDM; do
      [ -e /sys/firmware/acpi/tables/$f ] && cat /sys/firmware/acpi/tables/$f > $f.bin
    done
    dmidecode -t 0 -u | awk '/^\t\t[0-9A-F][0-9A-F]( |$)/' | xxd -r -p > smbios_type_0.bin
    dmidecode -t 1 -u | awk '/^\t\t[0-9A-F][0-9A-F]( |$)/' | xxd -r -p > smbios_type_1.bin

    That script generates up to four files in /tmp/MSDM.

    If you have a MSDM.bin file in /tmp/MSDM, then you’ve done this on the correct machine, and it does have hardware licensing. If you only have a SLIC.bin then you may or may not have a valid license. If you don’t have either, you’ve run this on the wrong machine and it doesn’t have a valid license.

    The SLIC table is used with earlier versions of Windows. From Win10 onwards it uses the MSDM table, and for many years machines had both.

    This is because if you upgraded your Win7 or 8 machine to Win10, and it doesn’t have a MSDM table, Microsoft are aware of this and have an electronic license that will be applied as part of the install.

    Take all the files you extracted and put them somewhere that Proxmox can see. I usually put them into a shared mount to ensure that you can migrate the VM without everything crashing.

    In this example, let’s put all of the files that were extracted into /mnt/pve/store1/slic/w11pro/ – SLIC.bin, MSDM.bin, and both smbios files.

    Turn off the VM that you want to automatically activate and edit the raw config file, as you need to make two changes:

    Add an args: line (or update if you have already created one) with the following settings (note this is all on one, long, line!)

    args: -acpitable file=/mnt/pve/store1/slic/win11pro/MSDM.bin -acpitable file=/mnt/pve/store1/slic/win11pro/SLIC.bin -smbios file=/mnt/pve/store1/slic/win11pro/smbios_type_0.bin -smbios file=/mnt/pve/store1/slic/win11pro/smbios_type_1.bin

    If you don’t have a MSDM.bin or SLIC.bin then you (obviously) don’t need to add it! If you don’t have either then there’s no use, you don’t have any activation certificates or keys!

    You also need to delete the ‘smbios1:’ line if it exists. This is because you are overriding it with the args above. If you do not remove it, you will not be able to start the VM.

    You can now turn on the VM and start a Windows install. If you have followed the standard instructions when creating your own ISO, or have used the ISO Builder Tool from Microsoft, you will know if it worked if you are not prompted for a product key when installing.

    If your ISO is configured to always ask for a product key, or always install a specific release, you won’t know until installation is complete.

    However, if you haven’t overridden the detection, you can check which version your SLIC or MSDM tables have activated as soon as the first reboot is complete, by pushing Shift-F10 to open a command prompt, and then running ‘winver’, which will display which version has been activated.
    If you only have a SLIC, make sure your VM has internet access as part of the install. Microsoft will activate the OS with the correct version, based on the hash of the two smbios files.
  • Windows 11 and Proxmox

    It’s been a long time since I had to build a custom ISO for Windows, but Windows 11 has been annoying me enough that I finally had enough and decided to pull my finger out and do it.

    Additionally, because I have the memory of a sieve, I thought I better write it down so I can look it up later. You’ll be amazed how many things I google to discover that I had already done that thing, and the first result is my ‘this is how to do it’ documentation.

    This is how to create a Win11 ISO for Proxmox, and how to use it. You can also (if you’re lucky) use your already existing Windows product key baked into the firmware of your machine to automatically activate it.

    Before you start, you need to be doing this on a Windows 11 machine. The exercise of getting, or creating one, is left up to the reader.

    Requirements

    1 – Windows 11 itself.
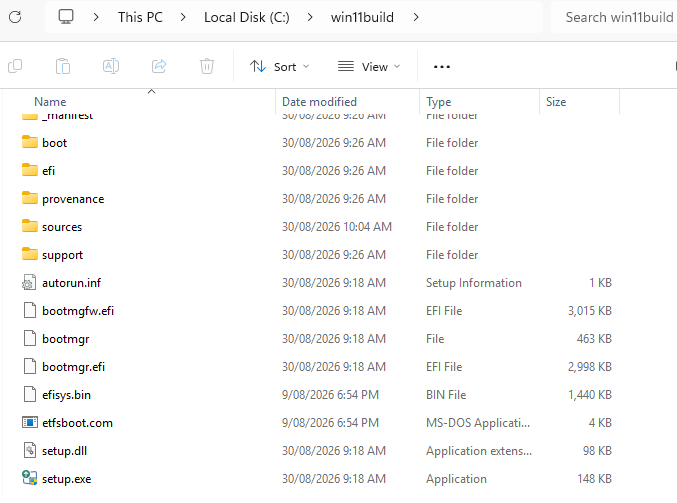
    You need the contents of an extracted ISO, on your local machine. A very simple way to do that, that also helps you out with autoconfig and things like that, is to use Rufus to generate a bootable USB (making sure all the anti-user stuff is disabled) and then copy the contents of that USB to somewhere on your PC. In this example I’m going to be using c:\win11build but you can use whatever you want. Copy the contents of the USB to c:\win11build and it should look something like this:

    If you used Rufus to extract and customise the image, in the sources directory there will be $OEM$/$$/Panther/unattend.xml which is where Rufus does its magic.

    2 – Oscdimg (which is part of the Windows ADK)
    You can get the ADK from Microsoft . Download and install it. This is the tool that creates a valid ISO from our c:\win11build directory

    3 – Redhat’s VirtIO Drivers. The public archive is here, but it always is very slow to download from. Because I’m impatient, I’ve created a local copy of virtio-win-0.1.302.iso here (which is the latest version as of August 2026) so it’s nice and fast, but that’s only for my convenience. You should probably download it from the source.

    Preparation

    To make it simpler for oscdimg to create a dual-mode (both UEFI and BIOS) ISO, you need to copy a few files into the c:\win11build directory.

    Copy the two files c:\win11build\efi\microsoft\boot\efisys.bin and c:\win11build\boot\etfsboot.com into c:\win11build. You will see these in my example screenshot above.

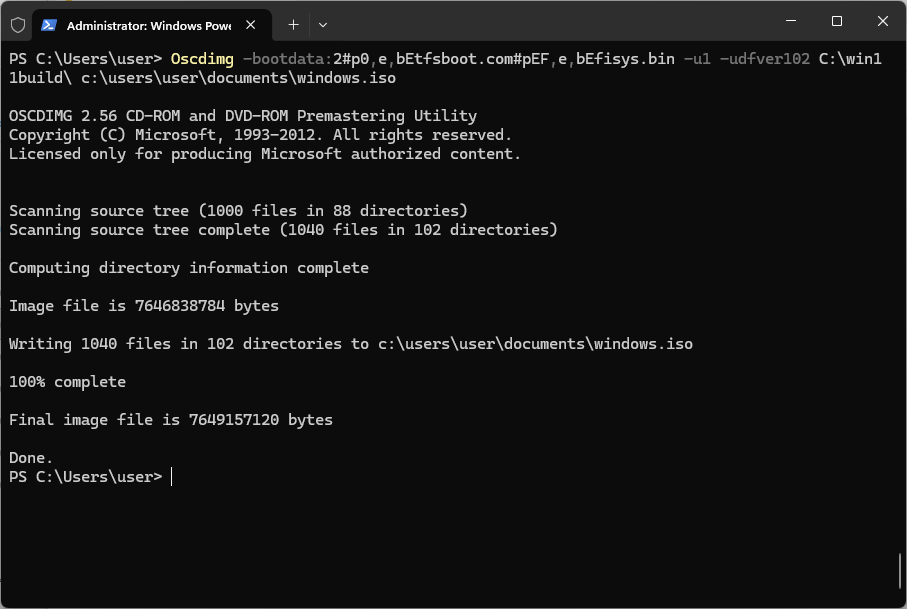
    At this point you should test that you actually can build an ISO by opening up a Terminal window as admin (right click on the start button and pick ‘Terminal (Admin)’) and running the following command:

    Oscdimg -bootdata:2#p0,e,bEtfsboot.com#pEF,e,bEfisys.bin -u1 -udfver102 C:\win11build\ c:\windows.iso

    The last parameter is where the ISO should be created. It will look something like this.

    If it errors, you need to solve that problem first. If it complains about Etfsboot or Efisys.bin missing, you didn’t copy them into c:\win11build in the previous step.

    Install VirtIO drivers

    There are quite a few ways to slipstream drivers into a Windows ISO, but after messing around with all of them, it turns out the easiest way is the best!

    Create a folder called ‘$WinPeDriver$’ in c:\win11build and copy all the drivers you want from your virtio ISO into it. You want at least NetKVM, and the VirtIO storage drivers from amd64/w11/viostor* and vioscsi.*

    If you’re as lazy as me, you’ll be happy to know I’ve done the work for you already. Simply extract WinPeDriver.7z into c:\win11build and it’ll put it all there for you.

    VirtIO Guest Tools

    I also suggest copying virtio-win-guest-tools.exe from the virtio ISO into c:\win11build because it’s something you’re always going to want to install.

    Build your ISO and test it

    Hopefully you still have that Terminal window open, because now you can just push uparrow and enter to rebuild the ISO. This time it will have all the drivers pre-installed and ready to go!

    Create a new VM, set everything to be virtio and try booting it from the ISO. If you used Rufus to remove all the annoyances, it will boot in both UEFI and BIOS mode. Otherwise it’ll only work in UEFI with a virtual TPM module. You can extract my OEM.7z into c:\win11build\sources which will create the $OEM$ directory and its contents. But you should probably create you own. There’s plenty of options.

    Activation

    If your proxmox host has a valid Windows licence baked into its firmware, you should now extract it so you can use it with your new shiny VM, which ended up being big enough for its own article.

  • I am building a new thing

    It’s a way for smaller ISPs to wholesale NBN services, without needing to go through the whole song and dance of becoming a NBN service provider, which has a bunch of requirements.

    One of the more complicated thing is Location ID lookups and Service Qualifications. This is the UX for Location lookups, and I’m pretty happy with it.

    If you’re looking for someone who can do this for you, don’t forget that I’m looking for work!

  • I’m looking for work!

    I’ve been messing around and not REALLY looking for work since I left Clearly IP, but the kids (and Greyhounds) need to be fed. This has lead me to realise that I should pull my finger out and actually do the ‘apply for jobs’ thing.

    The good news is that it appears my skills appear to be what everyone wants these days. Network Architect, AI Developer, Infosec Manager, Automation, Monitoring, DevOps, and a pile of other things.

    So if you’re looking for someone who has been doing IT and Internet stuff for 30 odd years, you should reach out. I’m happy for contracting or full time, but unless you’re in Gladstone, it’ll need to be remote 8)

    I’ve added a summary of my Resume to this post if you’re interested.

  • Mastodon.nz

    I’ve been lucky enough to be handed the reins of Mastodon.nz, to keep it running and secure after the current Admin ran out of time to look after it.

    As I already run mastodon.au, adding a new instance didn’t really make anything more complicated, so it was pretty easy to convince the current Admin that I could do it!

  • So who’s this xrobau guy?

    And more importantly, what’s the go with him and Mastodon?

    I’ll be filling out the ‘About’ page with a bit more information soon, but a quick summary is that he wrote the worlds leading Open Source phone system, has been nominated for the APNIC Executive Committee a few times, and is pretty much exactly the guy you need to fix your problems.